
Current VTO Program Key Dates and Links:
Service To: Longstreth Elementary, Philadelphia, PA, 8th Grade Art Students Regular (35) and Emotional Support (10), teacher: Joy Waldinger.
Key Dates & Deadlines:
1/14/21 9 am ET Orientation Meeting. (60 min)
1/15/21 EOD Complete Volunteer Code of Conduct Agreement
1/19/21 9 am ET Optional Training Support Drop In Meeting
1/20/21 EOD Digital Support Service Tasks Completed
1/21/21 9:00 am ET School Event
1/28/21 EOD Physical Support Service Tasks Completed
1/28/21 Time TBD Debrief Meeting (60 min)
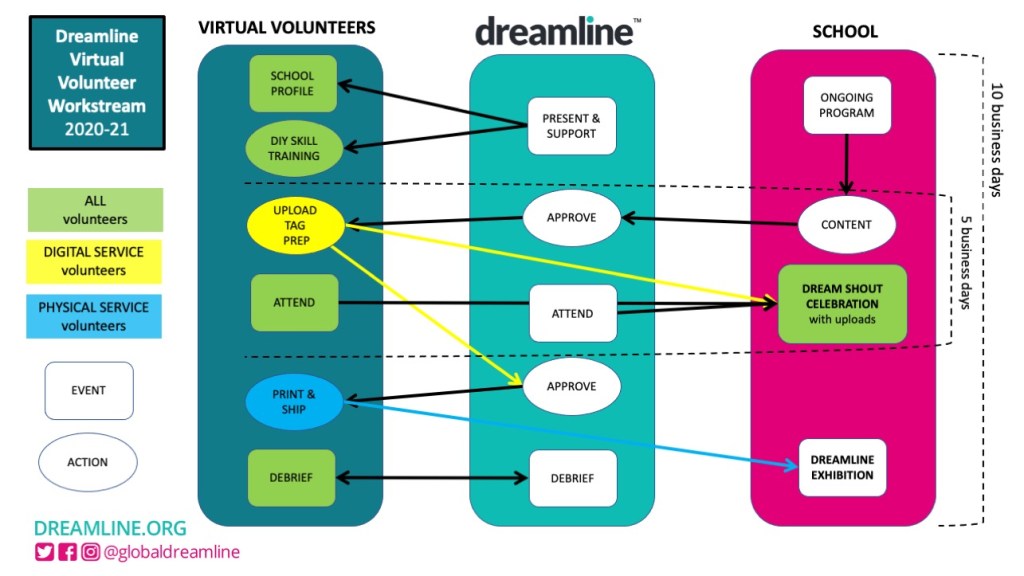
Documents: Detailed Program Workflow VTO Flyer
Welcome!


Welcome to Dreamline’s virtual volunteer center! You are at the center of change! Let’s get started.
You are supporting a school Dreamline program by doing digital and physical work that makes a Dreamline event for this teacher and their students possible. More importantly your work shows students their dreams matter–that someone “out there” who has never even met them supports their dreams. That’s a powerful endorsement.
Workflow
Below is a diagram of our workflow. The school gives material to us. We give it to you, you process it, and you deliver your work back to us or the school.
Most of the workflow happens within 5 business days–between the time the students complete their work and the scheduled online celebration of that work takes place.
The entire Virtual Volunteer experience happens within 10 business days– from the time of the first meeting to the debrief.
VTO TRAINING
There are two Virtual Volunteer Teams. You will be assigned to one.

You will be responsible for self-training for your role using the materials below and support from Camille.
Camille will have a Zoom “office hour” for you to drop in with any questions and can help out by email as well.

TRAINING MATERIALS FOR DIGITAL SERICE VOLUNTEERS
All videos include important information and are an essential part of successful training.
1.
| DOWNLOADING AND TRANSCRIBING BANNERS |
| PURPOSE This allows content of the banners to be searchable in our database and also makes it easier for our site visitors to read the words in some cases. |
| PROCESS You get a Google Doc with the Banner images in it and then transcribe the words from each onto a single document. |
| RESOURCES You will receive a link to a Google Drive Folder with your assigned Banners in jpg format. |
| VIDEO CONTENT Demonstrates the process with tips for good organization. |
2.
| ADDING SDG HASHTAGS TO TRANSCRIPTIONS |
| PURPOSE Adding SDG hashtags allows helps build and connect the Dreamline community and see the big picture of what people dream of changing. It allows people to search for and be inspired by thousands of others who share their concerns. It allows us to output and share aggregated data with educators and the public, showing Dream Banner alignments across any segment of our uploaded collection. |
| PROCESS For each of your Banners, do the following: Read the content of the Banner. Use the Dreamline SDG Hashtag Guide to identify 1 or more SDG topics addressed by that Dream Banner. Type the SDG hashtags at the bottom of the transcription. |
| RESOURCES Dreamline SDG Hashtag Guide |
| VIDEO CONTENT Demonstrates the process with an example Banner. |
3.
| UPLOADING BANNERS, RECORDINGS & TEXT |
| PURPOSE This allows Dream Banners, the voices of students, and the shared concerns for SDG topics to be shared globally on our site and mobile app. It sends a powerful message to each student that their dream counts. |
| PROCESS You access the Dreamline Admin interface for Virtual Volunteers with a web browser, you select the school, teacher, and group, then upload each Dream Banner, its voce file (if provided), and the transcription and SDG hashtags you recorded for each Banner. |
| RESOURCES Dreamline Admin Login Page Login and password will be sent to you. The school, teacher, and group (if applicable) will be sent to you. |
| VIDEO CONTENT The use of the Dreamline Admin interface is demonstrated in the uploaded of one sample banner with accompanying voice file and text. |
4.
| QR CODE CREATION AND PRINTING PREP |
| PURPOSE This creates the PowerPoint that will allow other volunteers to print each digital Dream Banner on cloth and connect it to a line for public display. In addition to the flag image, a QR code that connects each Banner to its digital form makes the physical banners interactive, connecting the cloth to image, sound, voice, map, and more. |
| PROCESS Insert one digital Dream Banner into each 8.5×11 in. page of the Dreamline Power Point Template. Then create a unique QR code for that Banner’s digital URL, size it down to 1 in. square, and put it in a lower corner of the Banner image. |
| RESOURCES Dreamline Power Point Template (download and save) QR Code Maker Site Dreamline Gallery |
| VIDEO CONTENT The entire process is demonstrated for one Banner. The ppt version of the Banner is created. The Banner’s unique URL is copied from a New Window display of the Banner on the Dreamline site. The URL is converted to a QR code and output to png file. The png file is inserted in the ppt slide for the Banner and sized down. |
5.
| QR TEST BEFORE SENDING |
| PURPOSE This is a quality control measure to ensure that the school receives a physical Dreamline with QR codes that are phone readable and accurate. |
| PROCESS Display each ppt slide you created on the screen and test the QR code using your phone. |
| RESOURCES If your phone does not have integrated QR code recognition in its camera feature (most do), you will need to download and install a free QR code reader. |
| VIDEO CONTENT Testing a QR code on the screen for one ppt slide is demonstrated. |
Note that after the completion of the ppt with QR codes, that file is sent to Camille, NOT to the virtual volunteer who will print them.
TRAINING FOR PHYSICAL SERICE VOLUNTEERS
1.
| PRINTING BANNERS ONTO FABRIC |
| PURPOSE We affirm student dreams physical Dreamlines. The physical Dreamline Banners on cloth are a format used by thousands of students on every continent where people live. Their uniform size and format represent Dreamline’s value of equity and inclusion. The form creates connection. |
| PROCESS Print each banner onto a piece of printable fabric. Remove the backing (if any) from the fabric. Do a test sheet before printing a group. |
| RESOURCES You will need a color inkjet printer. Printable fabric mailed to you by Dreamline. The ppt files sent to you by Dreamline staff. |
2.
| ASSEMBLING THE DREAMLINE BANNER |
| PURPOSE Dreamlines are a public statement of support for the community and each of its members. Many schools tell us of the lasting impact of this display which can be in schools, other public spaces, and at Dreamline events. |
| PROCESS Leave a foot at each end of the line. Staple banners on the ribbon with the Dreamline logo facing forward. Space them about 3 in. apart. Begin and end with any signage Banners provided by Dreamline. |
| RESOURCES You will need a stapler and staples. Ribbon provided by Dreamline. Signage Banners provided by Dreamline. |
After assembly of the banners, you will ship them to the address provided using a Dreamline provided shipping label.
They are usually sent to the teacher of the students.
